 Although simple, this is for the intermediate/advanced PSP user as I have few screen shots. But I also found out that trying is the best way to learn. *S* This tutorial was written by me and is ©momentzdesignz Any other tutorial that looks similar is purely coincidental and no infringement of any other artist is intended. For this tutorial you will need the following: PSP - V8 v8 Mask - Edge Ripples - or use a mask you prefer Tube of choice
1 - Open the tube you wish to use
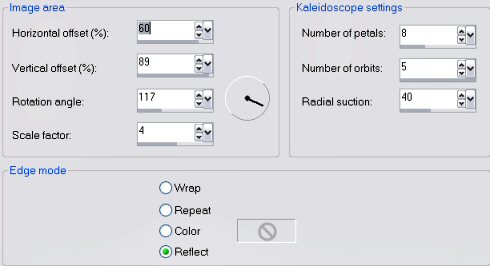
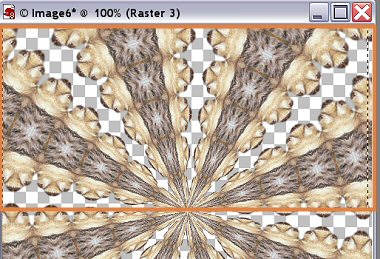
2 - Open a new image - 500 x 500 transparent - [we will resize later] 3 - Foreground set to dark color from your image 4 - Background set to light corresponding color 5 - Go to your tube > Copy 6 - Back to your transparent image > Paste as a New Layer 7 - Effects > Kaleidoscope : see setting in screen shot below  8 - Select your rectangle tool and cut your image in half - keeping the TOP from the center up - see screenshot below:  NOTE: I have outlined this in orange to make it easier to see. 9 - Keep Selected 10 - Selections > Invert 11 - Hit the Delete key and this will get rid of the bottom part 12 - Selections > Invert 13 - Effects > Texture Effects > Fur Settings: Blur 98, density 26, length 30, transparency 80 18 - Selections > Select none 19 - Add a new Raster layer 20 - Since you have chosen your colors already - go to your Text Tool 21 - Choose a floating wide font as the fill looks better for this tag 22 - With the mover tool, position the text right under your image so far 23 - Keep selected 24 - Effects > 3D Effects > Inner Bevel Settings: Bevel #2, width 5, smoothness 10, depth 11, ambiance 21, shininess 35, color - white, angle 315, intensity 36, elevation 40 25 - Effects > 3D Effects > Drop Shadow 26 - Layers > Layers merge visible 27 - Your tube should still be on your clipboard, so we will: 28 - Edit > Paste as a new layer 29 - Position your tube directly above your name or text 30 - Effects > 3D Effects > Drop Shadow Settings: V & H 3, opacity 70, blur 7 and color - black 31 - Repeat Drop Shadow only changing the V & H to -3 32 - Layers > Merge > Merge Visible 33 - Layers > Load mask from disk > Edge Ripples 34 - Click ok 35 - Right click on Mask layer and choose Delete 36 - Answer yes when asked if you want to merge into bottom layer 37 - Layers > Merge > Merge Group 38 - Layers > Merge > Merge all Flatten 39 - Image > Add border - 2 px - black 40 - Highlight with magic wand and Flood Fill with your dark color 41 - Re-size, add your watermark and save as a jpg If you have any questions, please feel free to email me. ©momentzdesignz 1999  Back to Tutorials |