 This tutorial was created in PSP X but can be easily done in other versions. I have also rated this as intermediate as I have few screen shots and brief explanations. This tutorial was written by me and is ©momentzdesignz Any other tutorial that looks similar is purely coincidental and no infringement of any other artist is intended. For this tutorial you will need the following: PSP X Image - choosing one that has the image in the center and a plain background Mask of choice - I used Edge Squares No outside filters required This 1st part is to show you how to change the background of an image that is plain to something different and then to frame it. Part I 1 - Open your image and duplicate 3 times. 2 - Close the original and minimize 2 copies for now. 3 - On your open image - go to: Layers > Load mask from disk 4 - On the mask layer - Layers > Delete 5 - When asked to merge into layer below; say Yes 6 - Layers > Merge > Merge Group NOTE: We are now back to 1 Layer, which is our masked image. 7 - Minimize your masked image for now and bring up your other image. 8 - Effects > Photo Effects > Sepia Toning and set: Amount to Age - 80 9 - Texture Effects > Soft Plastic with the following settings. Blur 95, Detail 67, Density 90, angle 177 and I used color #4666A6 10 - Right click on Layer Palette and Promote Background Layer. 11 - Layers > New Raster Layer 12 - Layers > Arrange > Send to Bottom 13 - Choose a very light color from your image and set as Foreground Color. 14 - Flood Fill Raster 2 15 - Back to Raster 1 and lower the opacity to around 40 - [or to your liking]. 16 - Layers > Merge > Merge All (Flatten) 17 - Right click and Copy your masked image onto this background as a New Layer. 18 - If you are happy with the image and the background; Layers > Merge > Merge All (Flatten). Part II Framing your image. 1 - Choose a co-ordinating color as your Foreground color. 2 - Choose a gold pattern of choice as your Background. 3 - With our image we enhanced, we are now going to add a frame. 4 - Image > Add Borders > 3 px 5 - Select with Magic Wand and flood fill with your gold pattern. 6 - Selections > Invert 7 - Effects > 3D Effects > Cutout Settings: V & H 3, Opacity 50, Blur 20, Color - black 8 - Repeat #7 only changing V&H to -3 9 - Selections > Select None 10 - Image > Add Borders 3 px - use your chosen Foreground color 11 - Image > Add Borders 3 px and Flood Fill with your gold pattern. 12 - Selections > Select None 13 - Image > Add Borders 25 px 14 - Select the border with Magic Wand, tolerance 0 15 - Go to Materials box and in the Foreground box - Select Pattern 16 - Find your 3rd image and set pattern with: Angle 46 and Scale 160 17 - Flood Fill your border with your pattern. 18 - Adjust > Blur > Gaussian Blur - 16 19 - Keep selected. 20 - Effects > Reflection Effects > Kaleidoscope - [see screen shot] 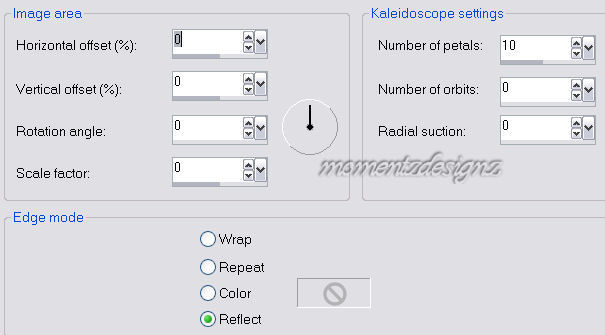 21 - Effects > 3D Effects > Inner Bevel Settings: Bevel #2, Width 20, Smoothness 0, Depth 5, Ambience 0, Shininess 0, Color - white, Angle 315, Intensity 50 and Elevation 30 22 - Selections > Select None 23 - Repeat Steps: 3, 4, 9 and 10 for your 3 small borders. 24 - Selections > Select All 25 - Selections > Modify > Contract: 9 26 - Selections > Invert 27 - Repeat Step #9 for the Inner Bevel 28 - Selections > Select None 29 - Add decorative corners if you wish. 30 - Add your watermark, re-size and save as a .jpg Thank you and I hope you have enjoyed this tutorial :o) ©momentzdesignz - 1999 |