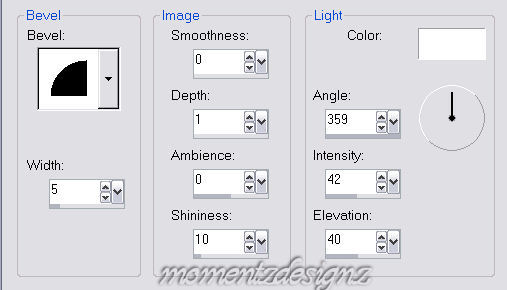
 Supplies Needed: Image of choice Plugin: Filters Unlimited 2.0 - Tiles & Mirrors Corners if desired 1 - Open your image and duplicate twice; close the original and minimize 1 copy for now. 2 - Set Foreground and Background to 2 corresponding colors from your image. 3 - In Foregrounf box - click on Gradient and look for your Foreground/Background gradient. 4 - Settings for this gradient: Style - Radial, angle 50, repeats 39 and Center points - H & V at 50. 5 - Image > Add Border - 5 px 6 - Select the border and flood fill with your gradient and keep selected. 7 - Effects > Edge Effects > Enhance 8 - Selections > Select none 9 - Image > Add Border - 25 px 10 - In materials pallette, choose your gradient and change the 'Center Point': H & V 100 11 - Flood fill your border and keep selected. 12 - Effects > 3d Effects Inner Bevel ... see screenshot  13 - Change your gradient Center Point back to: H & V 50 14 - Selections > Select None 15 - Image > Add Border - 3 px 16 - Select the border and flood fill with your gradient. 17 - Selections > Select None 18 - Image > Add Border - 45 px 19 - On Materials Pallette, in the background change to pattern. Find your minimized image and flood fill this new border; keep selected. 20 - Effects > Filters Unlimited 2.0 > Tiles & Mirror Settings: Mirrored and Scaled set at Default. 21 - Repeat this plugin 2 more times. 22 - Selections > Select None 23 - Image > Add Border - 3 px 24 - Flood fill the border with your gradient and keep selected. 25 - Apply the same Inner Bevel as we did in step #11 26 - Selections > Select None 27 - Add decorative corners if you wish. 28 - Add watermark, re-size and save as a jpg. If you have any questions, please feel free to email me. ©momentzdesignz 1999 Back to Tutorials |